
Making a no carve pumpkin is an easy way to decorate a pumpkin without all the mess of pumpkin carving. Here is how to get started with no carve pumpkin decorating.
When you make a purchase using a link on this page, we may receive a commission. As an Amazon Associate I earn from qualifying purchases. For more information, please see About Us.
Looking for a fun, no mess way to decorate a pumpkin? This post shows some ideas for decorating a DIY no-carve pumpkin, a fun fall activity.
Going to a pumpkin patch to pick out a pumpkin is a great fall activity, but if you don’t have a farm nearby, you can always go to the grocery store.
Pumpkins, other types of winter squash, and gourds work well for this fall craft activity. You can use real pumpkins from the pumpkin patch or grocery store, or you can use artificial pumpkins to decorate for the season.
The best thing about decorating these pumpkins is that no carving is required. That means that less mess is involved for you to have to clean up—unless you bring out the glitter, of course.


Here are some popular artificial pumpkins to use for decorating:
- White Artificial Pumpkins
- Mini Artificial Pumpkins
- White Artificial Pumpkin
- Black Artificial Pumpkins
One benefit to using artificial pumpkins is that they don’t go bad like real pumpkins do, and you can use your decorated artificial pumpkins from season to season.
Paint Markers
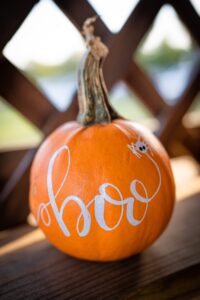
One of the easiest ways to do no carve pumpkin decorating is to use paint markers to draw or write on pumpkins.


Fantastic paint marker colors to use include:
You can use crafting supplies, like acrylic paint, paint markers, or stickers, or a combination of all three, to decorate pumpkins for fall.
Acrylic Paint
If you’re a big fan of natural looking artificial pumpkins or pumpkins that come in colors other than bright orange, then decorating pumpkins with acrylic paint may be just the thing to do. This works especially well with artificial pumpkins, like the ones shown above.


Paint colors like cameo blush pink, blue mist, sweet mint, buttermilk, and terracotta are perfect for getting a rustic, high end look. You can also mix paint colors to come up with your own custom pumpkin paint colors.
Acrylic paint is a popular paint to use for decorating pumpkins. Here are some great fall colors to use.
A few coats of paint can be an easy way to make pumpkins look amazing. Use a foam paintbrush to apply the paint, and let the paint dry after applying each coat.


Pumpkin Decorating Stickers
No carve pumpkin decorating can be a fun fall activity to do on a rainy day or weekend. It can also be fun to decorate no carve pumpkins with kids, especially when using pumpkin decorating stickers.


Pumpkin stickers are easy to use–simply apply them to clean pumpkins and you have festive fall pumpkin decor without much clean up involved.
Now that covered some of the ways to decorate no carve pumpkins, both real pumpkins and artificial pumpkins, here are some tips on how to decorate no carve pumpkins at home.
How to Make a DIY No Carve Pumpkin | Easy Fall Decor Ideas
What You’ll Need
- Pumpkin
- Paint
- Foam Paintbrush
- Paint Markers
- Acrylic Paint
- Pumpkin Decorating Stickers
Steps for Decorating a No Carve Pumpkin
Here are some steps on how to decorate a no carve pumpkin or artificial pumpkin for easy fall home decor.
1–Make sure your pumpkin is clean.
Paint won’t stick to a pumpkin that is dirty, so wash your pumpkin off with some dish soap and water and then pat it dry with a towel. Let the pumpkin fry for an hour or so before decorating it.
2–Paint your pumpkin.
Often, decorated pumpkins are painted a base color, and then other designs are painted over that. Black and white are popular base colors for pumpkins. Gold is fun, too.
You can also paint your pumpkin to match the decor of your room or house. A foam paintbrush makes it easy to paint over wide spaces.
Once the pumpkin is painted, let the paint dry according to the directions on the paint package. You usually need to allow at least an hour or two for the paint to dry.
3–Add a design to the pumpkin.
Use a paint marker to draw a design on your pumpkin. Cute pumpkin design ideas include faces and expressions, stars, triangles, leaves, hearts, or whatever design you come up with.
Fine-point paint markers make it easy to do fine drawings and detail work, while medium-point markers make it easier to draw or paint over a larger area.
4–Fill in the designs.
Once you have drawn the designs that you want, use a paint marker or another type of craft paint to fill them in. Let the second round of paint dry. You can also add a third coat of paint, or more, to get the effect that you’re looking for.
5–Display your pumpkin.
Now your pumpkin is ready to display. No carve pumpkins make great decorations for tabletops, mantles, living rooms, and more.
This post was about how to decorate a no carve pumpkin.
— —
Credits
- Photos by Brian Wegman / Pexels, Lisa Fotios / Pexels, Jessica Lewis / Pexels, and Griffin Wooldridge / Unsplash
- Photos are for illustration purposes only.